GM B-Body Forum, 77-79 Caprice/Impala Forum

Join Now If Your A 1977- 1979 Caprice or Impala owner or other GM B-Body owner!!!
Like us on Facebook https://www.facebook.com/BBodyForum?ref=hl

Join the forum, it's quick and easy

GM B-Body Forum, 77-79 Caprice/Impala Forum

Join Now If Your A 1977- 1979 Caprice or Impala owner or other GM B-Body owner!!!
Like us on Facebook https://www.facebook.com/BBodyForum?ref=hl

GM B-Body Forum, 77-79 Caprice/Impala Forum

Would you like to react to this message? Create an account in a few clicks or log in to continue.
GM B-Body Forum, 77-79 Caprice/Impala Forum

A forum for the owners and enthusiasts of General Motors B-Bodies from 1977-1990, but dedicated to the owners of 1977-1979 Impalas and Caprices. Join up now!


5 posters

    Caprice/Impala Ridetech HQ series: Shockwave front and coolride rear install

    Gooched78Caprice
    Gooched78Caprice
    Freshman Member (Tier 3)
    Freshman Member (Tier 3)
    5th Year Anniversary
    Celebrating 5 years of being our member!


    Posts : 108
    Join date : 2014-11-06
    Location : Border riding in the 3-6-oh & 5-oh-3 WA/OR

    Caprice/Impala Ridetech HQ series: Shockwave front and coolride rear install - Page 2 Empty Re: Caprice/Impala Ridetech HQ series: Shockwave front and coolride rear install

    Post  Gooched78Caprice Tue Mar 24, 2015 2:43 pm

    Sweet Seventy9 wrote:
    solo79 wrote:Definitely want to see how much cutting it takes on the front pocket.  So far though, would you say that you could easily re-install the factory rear springs and shocks with no problem?   

    Wondering those things myself.  What tool will you use to do the cutting?  


    Here's the total modification of Irene's body that she received during her time on the cutting table:

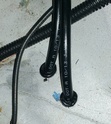
    First were the 4, 1/2" holes under the back seat to insert the grommets and run the 3/8" hoses.

    Caprice/Impala Ridetech HQ series: Shockwave front and coolride rear install - Page 2 Airlin10

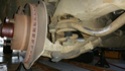
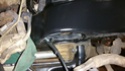
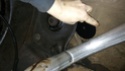
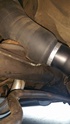
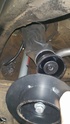
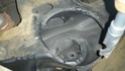
    Then I cut the front outer frame spring pocket to create the clearance to make sure I could run my fingers around the bags and make sure they didn't rub on anything.

    Caprice/Impala Ridetech HQ series: Shockwave front and coolride rear install - Page 2 Pocket10

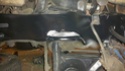
    The upper corner of the air spring towards the cab was the problem causing the extra trimming for clearance

    Caprice/Impala Ridetech HQ series: Shockwave front and coolride rear install - Page 2 Finger10

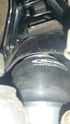
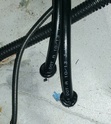
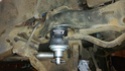
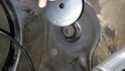
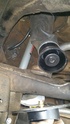
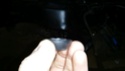
    After double checking with Ridetech that where their instructions state that you'll need NO modifications to the upper or lower shockwave mounts to fit, to get the Delrin bushing to fit/work properly you actually need to drill a 3/4" hole in the upper mount to seat the bushing properly otherwise you'll smash them.

    Caprice/Impala Ridetech HQ series: Shockwave front and coolride rear install - Page 2 Upperh10

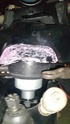
    Here's the smashed one from initial fitment.

    Caprice/Impala Ridetech HQ series: Shockwave front and coolride rear install - Page 2 Delrin11


    Ridetech was more than happy to resend new one but I don't think they sounded like they cared to fix their instructions. I was actually told I could probably use a file to clear the space if I didn't have a drill bit. I don't think he's used a file on a frame before because a $20 bit and the time back and forth to the store and then the 5 minutes to drill them out in my opinion is way better and more efficient than ever trying to file a frame from about 1/2" to 3/4" I'd still probably be at it today if that's the route I went.  scratch

    Let me know what other questions/ideas you might have and be expecting a full write up and pics this weekend. Tonight is cleaning up the last of the wiring and getting some beauty shots to add tomorrow if the weather is cooperating after work tonight.
    Sweet Seventy9
    Sweet Seventy9
    *Senior Moderator*
    *Senior Moderator*
    Helpful and Responsive Member!
    Very active with responding and helping other members with questions and concerns.
    10th Year Anniversary
    10 years of being a member on our forum!


    Posts : 973
    Join date : 2013-11-03
    Location : Upstate NY

    Caprice/Impala Ridetech HQ series: Shockwave front and coolride rear install - Page 2 Empty Re: Caprice/Impala Ridetech HQ series: Shockwave front and coolride rear install

    Post  Sweet Seventy9 Tue Mar 24, 2015 3:15 pm

    It's coming along nice, Bro.

    Instructions? We don't need no stinking instructions! (said in my best mexican bandito voice, lol)
    Gooched78Caprice
    Gooched78Caprice
    Freshman Member (Tier 3)
    Freshman Member (Tier 3)
    5th Year Anniversary
    Celebrating 5 years of being our member!


    Posts : 108
    Join date : 2014-11-06
    Location : Border riding in the 3-6-oh & 5-oh-3 WA/OR

    Caprice/Impala Ridetech HQ series: Shockwave front and coolride rear install - Page 2 Empty Re: Caprice/Impala Ridetech HQ series: Shockwave front and coolride rear install

    Post  Gooched78Caprice Tue Mar 24, 2015 4:05 pm

    Sweet Seventy9 wrote:It's coming along nice, Bro.

    Instructions?  We don't need no stinking instructions!  (said in my best mexican bandito voice, lol)

    The voice in my head sounds a lot like a Mexican Bandito as well! I told him, "Es no Bueno!"

    I read and reread these damn things anymore since it always cost too much not to, or I end up having to undo everything to get back to step one since that tends to be the one I always overlook. From the other earlier question I overlooked as well, the rear can easily be changed right back to stock.  cheers
    Gooched78Caprice
    Gooched78Caprice
    Freshman Member (Tier 3)
    Freshman Member (Tier 3)
    5th Year Anniversary
    Celebrating 5 years of being our member!


    Posts : 108
    Join date : 2014-11-06
    Location : Border riding in the 3-6-oh & 5-oh-3 WA/OR

    Caprice/Impala Ridetech HQ series: Shockwave front and coolride rear install - Page 2 Empty Taa - daa!

    Post  Gooched78Caprice Sun Mar 29, 2015 6:05 pm

    FIRST IMPRESSION... AIR RIDE IN THIS CAR IS AMAZING!!!  Twisted Evil  Shocked  Laughing  Cool  affraid

    I will explain this process as I have found to be the most straight forward. Hopefully this approach will help with getting this put together and back on the road as quickly as possible to enjoy. AIR RIDE IN THIS CAR IS AMAZING!!!

    Tools:
    BF'n Hammer
    cutting wheel and grinder(what I used), plasma torch, whatever you have to take a 2" x 5" chunk of the frame
    pickle fork
    3/4" drill bit
    wrench and socket set up to 15/16
    allen wrench for removing brake calipers
    socket set with a long 18"+ extension
    jack stands and jack
    grommets for any holes to run airlines through body
    vinyl/rubber hoses to help protect airlines that go through the frame
    zip ties to tie up air hoses and wires during install
    *T15 star socket if you get HQ shockwaves to take the adjustment knob on and off during install.

    Chapter I. The arrival... DO NOT READ!!!

    WOO --HOO!
    Caprice/Impala Ridetech HQ series: Shockwave front and coolride rear install - Page 2 Arriva10

    Step one: a) IMPORTANT: Only reference RideTech's instructions for running ECU and wires. All other instructions please throw away and you'll have a much easier time using simple common sense during install. Any time I went by the provided instructions during airshock install it ended with a call to their Tech support, a WTF moment of "I did what the instructions say and it doesn't seem right, SMH"... or mostly both. If I would of went by my initial thoughts of common sense installation during assembly I would have had this done a week sooner rather than waiting for replacement pieces being shipped. FYI, Inside the DO NOT READ envelope is marketing material, warranty papers and info how to get a free Ridetech shirt.

    b) get car up on jack stands and remove wheels (I placed the wheels strategically under car just in case any accidents were to happen with HF stands, which for all my projects have worked incredible well at $10 each)

    Step two: remove everything to get to front shocks following Myloths write up (link in post one on this thread)

    Caprice/Impala Ridetech HQ series: Shockwave front and coolride rear install - Page 2 Startr10

    Step three: Remove rear shocks and springs. Video below was on 1977 Impala:

    https://www.youtube.com/watch?v=2JAYsVs3r2U

    Chapter II. Out with the old, in with the new...

    Step four: Getting a plan for the brains:

    I did a mock install for my tank, compressors, valves, wiring harness and the ECU in the trunk rear shelf above the rear wheel arch.

    Caprice/Impala Ridetech HQ series: Shockwave front and coolride rear install - Page 2 Trunks10


    Step 5: Getting the brains to communicate with the arms and legs.

    I routed my air lines under my rear seats and right above a preexisting hole in the frame. This way I was able to run to the air lines as discreetly as possible. I put grommets in the frame to keep the lines from being cut up, you'll want a firmer plastic type grommet as I found out quickly the soft rubber ones sliced right in half just pulling the line through. The harder plastic ones held up like a champ with no sign of wear.

    Caprice/Impala Ridetech HQ series: Shockwave front and coolride rear install - Page 2 Airlin11

    For the front shockwave to be installed you will need to drill a 3/4 inch hole through the upper shock mount to allow the Delrin ball to function properly. Even if instructions tell you otherwise...

    Caprice/Impala Ridetech HQ series: Shockwave front and coolride rear install - Page 2 Upperh12

    ....waiting for my computer to finish uploading my current pics.... to be continued....
    solo79
    solo79
    *Senior Moderator*
    *Senior Moderator*
    10th Year Anniversary
    10 years of being a member on our forum!


    Posts : 458
    Join date : 2013-02-06
    Location : Kentucky

    Caprice/Impala Ridetech HQ series: Shockwave front and coolride rear install - Page 2 Empty Re: Caprice/Impala Ridetech HQ series: Shockwave front and coolride rear install

    Post  solo79 Sun Mar 29, 2015 6:34 pm

    Excellent write up so far!  I'm going to be ahead now when I go to do this.  I knew about the frame cutting from a friend of mine who is putting air ride on an s-10 as he too said you have to shave that outer lip out some. I was just waiting to see how much it would take if any on a larger frame and it looks like there is no way around it after all.  It looks like it won't affect structural integrity too much though, however, I'll be plating that area just in case.  The one thing that sort of disturbs me is the enlarging of the top shock mount as that will render a lot of play in factory shocks if you ever put those back in.  I guess a person could sleeve it though.  Overall, much less damage then installing hydraulics and I'm pretty happy with the results so far.

    One question, what about those spring "fingers" at the top in the front (the little triangular teeth up in there.  Do they not interfere with the bag/assembly at all?  Just curious, because those have to be cut completely off for hydraulics.  Looking great man!  Keep it up!
    Gooched78Caprice
    Gooched78Caprice
    Freshman Member (Tier 3)
    Freshman Member (Tier 3)
    5th Year Anniversary
    Celebrating 5 years of being our member!


    Posts : 108
    Join date : 2014-11-06
    Location : Border riding in the 3-6-oh & 5-oh-3 WA/OR

    Caprice/Impala Ridetech HQ series: Shockwave front and coolride rear install - Page 2 Empty Re: Caprice/Impala Ridetech HQ series: Shockwave front and coolride rear install

    Post  Gooched78Caprice Mon Mar 30, 2015 10:11 am

    solo79 wrote: One question, what about those spring "fingers" at the top in the front (the little triangular teeth up in there.  Do they not interfere with the bag/assembly at all?  Just curious, because those have to be cut completely off for hydraulics.  Looking great man!  Keep it up!

    That is something you'll want to look at. None of the fingers hung down more than 1/2" from the top of the frame, if you look at the pic it almost looks like the fingers have already been trimmed about half off. I don't have a clue if they normally did that at the factory. I know the previous owner had the front end of her lowered so maybe it was done then?

    The instuctions from Ridetech say to do so... They also say I don't have to modify the upper mount for the Shockwave... I've double and triple checked the "fingers" and they don't even get close to the shockwave's body, bag, or the connection for the air lines. So I feel safe leaving them in there. The instructions for mounting these shockwaves are not very accurate I've come to find out, unless the 1978 and 1991-1996 Caprice's do have more differences than I've ever noticed before, which could also be true.  

    When you are ready to get to that part of your project I have a lot of additional pics I can share, just let me know. I'm trying to cover everything in this thread so please keep asking about things I can add or just possibly might be overlooking. Your questions have helped me a ton during this install. All of your feedback has been greatly appreciated.
    Gooched78Caprice
    Gooched78Caprice
    Freshman Member (Tier 3)
    Freshman Member (Tier 3)
    5th Year Anniversary
    Celebrating 5 years of being our member!


    Posts : 108
    Join date : 2014-11-06
    Location : Border riding in the 3-6-oh & 5-oh-3 WA/OR

    Caprice/Impala Ridetech HQ series: Shockwave front and coolride rear install - Page 2 Empty Here she is!!!

    Post  Gooched78Caprice Mon Mar 30, 2015 10:36 am

    Finally was able to get this loaded... If there is a way to upload video from my computer without loading on to youtube please let me know.

    HERE IS IRENE A. RITTLE

    Caprice/Impala Ridetech HQ series: Shockwave front and coolride rear install - Page 2 Heresh10

    If you are looking to see your car go up and down as much as possible please do not buy these shockwave's, the cool rides would be great for that. If you want to be able to dial in your suspensions complete ride and feel with slight adjustments in air pressure and lay your car about 1.5" inches off the ground when parked.. They are worth every cent. Not much travel in the front but you can really feel the difference in firmness as you slightly increase/decrease the air pressure. Tons of travel in the back for a little show but I feel this is more about the go factor!


    Last edited by Gooched78Caprice on Mon Mar 30, 2015 10:40 am; edited 1 time in total (Reason for editing : update *you to your)
    Myloth
    Myloth
    Moderator
    Moderator
    Helpful and Responsive Member!
    Very active with responding and helping other members with questions and concerns.
    5th Year Anniversary
    Celebrating 5 years of being our member!


    Posts : 638
    Join date : 2014-06-09
    Location : At the base of the Mountain (NY) Adirondacks

    Caprice/Impala Ridetech HQ series: Shockwave front and coolride rear install - Page 2 Empty Re: Caprice/Impala Ridetech HQ series: Shockwave front and coolride rear install

    Post  Myloth Mon Mar 30, 2015 11:44 am

    How high can the rear go up or down?
    Gooched78Caprice
    Gooched78Caprice
    Freshman Member (Tier 3)
    Freshman Member (Tier 3)
    5th Year Anniversary
    Celebrating 5 years of being our member!


    Posts : 108
    Join date : 2014-11-06
    Location : Border riding in the 3-6-oh & 5-oh-3 WA/OR

    Caprice/Impala Ridetech HQ series: Shockwave front and coolride rear install - Page 2 Empty Re: Caprice/Impala Ridetech HQ series: Shockwave front and coolride rear install

    Post  Gooched78Caprice Mon Mar 30, 2015 12:09 pm

    Myloth wrote:How high can the rear go up or down?

    I will either get a video on here or pics at ride height, topped out, lowered and aired out. I'll make sure to break out the tape measure to answer this question for you.
    Gooched78Caprice
    Gooched78Caprice
    Freshman Member (Tier 3)
    Freshman Member (Tier 3)
    5th Year Anniversary
    Celebrating 5 years of being our member!


    Posts : 108
    Join date : 2014-11-06
    Location : Border riding in the 3-6-oh & 5-oh-3 WA/OR

    Caprice/Impala Ridetech HQ series: Shockwave front and coolride rear install - Page 2 Empty Installation part 2...

    Post  Gooched78Caprice Mon Mar 30, 2015 2:03 pm

    Chapter III. Running and Cutting...

    Step Six: Find the route that works best to get air to all 4 corners for fitment.

    Running the airlines is completely subjective. However they best fit your project is the best way to do it. Only thing you can do wrong is leaving them too loose to get caught on something, having them too close to a heat source, or not protecting them from contacting sharp edges. The places that had any potential of rubbing or coming in contact with edges I ran the airlines through hose I picked up through a local hardware store.

    To the front pocket...
    Caprice/Impala Ridetech HQ series: Shockwave front and coolride rear install - Page 2 Fronta13
    To the rear...
    Caprice/Impala Ridetech HQ series: Shockwave front and coolride rear install - Page 2 Airlin13

    Step 7: Run the power to the battery and make sure you have the compressor(s) working and air is filling the tank. Check for leaks at fittings by spraying some soapy water on the fittings, no bubbles no leaks. If you see bubbles slowly tighten until they disappear. For the fittings I just used Teflon tape with approximately 2 or 3 wraps around the fitting.

    I picked up a wire distribution block to run the power to the compressors and ECU as cleanly as possible. I ran a 4AWG wire from the battery to this connection box and created a ground in the trunk. I purchased one that incorporates the fuses for a little extra $ but saves from splicing the wires to add the fuses that Ridetech sends.  I was able to then mount everything to the board under the compressor with the ECU hidden away from any view.
    Caprice/Impala Ridetech HQ series: Shockwave front and coolride rear install - Page 2 Wiring12

    Step 8: Now the air is ran to the four corners you can connect the front shockwaves and air hoses to start the fitment.

    Initially I thought there was plenty of clearance for the front bags to expand on Shockwave..
    Caprice/Impala Ridetech HQ series: Shockwave front and coolride rear install - Page 2 Cleara12

    As soon as air went in I quickly found out otherwise. I used chalk to mark where the bag expanded to where I couldn't run my hand around it.
    Caprice/Impala Ridetech HQ series: Shockwave front and coolride rear install - Page 2 Fittin11

    Step Nine: Measure and measure again. Easier to cut out a little more than add it back on. I used a cutting wheel to get the main piece out and used a grinder to fine tune until I could run my finger completely around the bag without touching.

    Here's the final inspection of the bag clearance to the frame:
    Caprice/Impala Ridetech HQ series: Shockwave front and coolride rear install - Page 2 Finger11

    After a coat of paint this is what was left:
    Caprice/Impala Ridetech HQ series: Shockwave front and coolride rear install - Page 2 Pocket13

    Now the front is almost finished it's time to move to the back of the car.... to be continued...
    Sweet Seventy9
    Sweet Seventy9
    *Senior Moderator*
    *Senior Moderator*
    Helpful and Responsive Member!
    Very active with responding and helping other members with questions and concerns.
    10th Year Anniversary
    10 years of being a member on our forum!


    Posts : 973
    Join date : 2013-11-03
    Location : Upstate NY

    Caprice/Impala Ridetech HQ series: Shockwave front and coolride rear install - Page 2 Empty Re: Caprice/Impala Ridetech HQ series: Shockwave front and coolride rear install

    Post  Sweet Seventy9 Mon Mar 30, 2015 4:55 pm

    Gooched78Caprice wrote:

    Caprice/Impala Ridetech HQ series: Shockwave front and coolride rear install - Page 2 Heresh10


    Bro! I love the stance! She's sittin' LOW! Is that at ride height?

    What size rear wheel and tire are you using? How much space do you have between the tire and fender lip?

    When lowered and turning the steering wheel lock to lock, do the front tires rub at all? I ran into problems once when I cut the front coils to lower one of my cars. Anything bigger than a 225/60-16 would rub. I could have welded on some stops, but LOL, I just never turned the wheels that sharp and all was well!
    solo79
    solo79
    *Senior Moderator*
    *Senior Moderator*
    10th Year Anniversary
    10 years of being a member on our forum!


    Posts : 458
    Join date : 2013-02-06
    Location : Kentucky

    Caprice/Impala Ridetech HQ series: Shockwave front and coolride rear install - Page 2 Empty Re: Caprice/Impala Ridetech HQ series: Shockwave front and coolride rear install

    Post  solo79 Mon Mar 30, 2015 7:23 pm

    Gooched78Caprice wrote:Finally was able to get this loaded... If there is a way to upload video from my computer without loading on to youtube please let me know.

    HERE IS IRENE A. RITTLE

    Caprice/Impala Ridetech HQ series: Shockwave front and coolride rear install - Page 2 Heresh10

    If you are looking to see your car go up and down as much as possible please do not buy these shockwave's, the cool rides would be great for that.

    Wow, love that stance!  Brings back memories.  I guess my biggest challenge is I want to achieve close to what I could with hydraulics as far as being able to sit it down real low, but also be able to raise the front and rear past factory height.  I've been told that I will not get the travel I had with hydraulics.  Here are some shots of my former car all the way down and how high it went front and back for reference:

    Caprice/Impala Ridetech HQ series: Shockwave front and coolride rear install - Page 2 Car910

    Caprice/Impala Ridetech HQ series: Shockwave front and coolride rear install - Page 2 Car610

    Caprice/Impala Ridetech HQ series: Shockwave front and coolride rear install - Page 2 Car2110

    Caprice/Impala Ridetech HQ series: Shockwave front and coolride rear install - Page 2 Car2210

    I would love to be able to do this with air.  Looking forward to shots of your car in these positions.  I couldn't find one with mine locked all the way up front and back.  Would like to see what yours looks like all the way up front and back.
    GM B-Body Forum
    GM B-Body Forum
    Admin
    Admin
    Helpful and Responsive Member!
    Very active with responding and helping other members with questions and concerns.
    10th Year Anniversary
    10 years of being a member on our forum!


    Posts : 755
    Join date : 2013-01-14
    Age : 31
    Location : Flint/Detroit, MI - Charlotte, NC

    Caprice/Impala Ridetech HQ series: Shockwave front and coolride rear install - Page 2 Empty Re: Caprice/Impala Ridetech HQ series: Shockwave front and coolride rear install

    Post  GM B-Body Forum Mon Mar 30, 2015 11:18 pm

    what size tires do you have in that pic?
    Gooched78Caprice
    Gooched78Caprice
    Freshman Member (Tier 3)
    Freshman Member (Tier 3)
    5th Year Anniversary
    Celebrating 5 years of being our member!


    Posts : 108
    Join date : 2014-11-06
    Location : Border riding in the 3-6-oh & 5-oh-3 WA/OR

    Caprice/Impala Ridetech HQ series: Shockwave front and coolride rear install - Page 2 Empty Re: Caprice/Impala Ridetech HQ series: Shockwave front and coolride rear install

    Post  Gooched78Caprice Tue Mar 31, 2015 5:41 pm

    GM B-Body Forum wrote:what size tires do you have in that pic?

    I believe they all are 225/60-15, it made me laugh when SS9 said the size of tires on the car he cut the coils since mine were cut as well and I believe to be running the exact same size he mentioned. They're the shoes she came, I did switch out the center caps but the tires are the same so I am not 100% positive. I will verify this when I get a chance to get a couple more pics, hopefully tonight even though weather is not currently cooperating. I live in Washington so in 15 minutes it could be perfectly sunny again.
    Gooched78Caprice
    Gooched78Caprice
    Freshman Member (Tier 3)
    Freshman Member (Tier 3)
    5th Year Anniversary
    Celebrating 5 years of being our member!


    Posts : 108
    Join date : 2014-11-06
    Location : Border riding in the 3-6-oh & 5-oh-3 WA/OR

    Caprice/Impala Ridetech HQ series: Shockwave front and coolride rear install - Page 2 Empty Re: Caprice/Impala Ridetech HQ series: Shockwave front and coolride rear install

    Post  Gooched78Caprice Wed Apr 01, 2015 11:06 am

    GM B-Body Forum wrote:what size tires do you have in that pic?

    After checking yesterday the tires are actually 235/60-15.
    Gooched78Caprice
    Gooched78Caprice
    Freshman Member (Tier 3)
    Freshman Member (Tier 3)
    5th Year Anniversary
    Celebrating 5 years of being our member!


    Posts : 108
    Join date : 2014-11-06
    Location : Border riding in the 3-6-oh & 5-oh-3 WA/OR

    Caprice/Impala Ridetech HQ series: Shockwave front and coolride rear install - Page 2 Empty Re: Caprice/Impala Ridetech HQ series: Shockwave front and coolride rear install

    Post  Gooched78Caprice Sun Apr 05, 2015 5:21 pm

    Chapter IV.. Space, the fun of making it disappear... The final installation.

    Here's all the parts for the rear installation:
    Caprice/Impala Ridetech HQ series: Shockwave front and coolride rear install - Page 2 Rearsp10

    After getting the front clearance all figured out and connecting the control arms it's time to take a look at the rear...

    Here's a view from the lower spring perch on the axle of where this will be going:
    Caprice/Impala Ridetech HQ series: Shockwave front and coolride rear install - Page 2 Axlevi10

    Step 10: Install the Shocks and place the upper bag mounting plate on the top of the spring perch. This is how the upper bag mount is firmly held in place.

    Here's a view of the plate:
    Caprice/Impala Ridetech HQ series: Shockwave front and coolride rear install - Page 2 Uppers10

    Caprice/Impala Ridetech HQ series: Shockwave front and coolride rear install - Page 2 Bracke11

    Step 11: Plug air line into the bag once connected. Add minimal air to get bag to expand and attach lower mounting plates.

    Lower mounting plates:
    Caprice/Impala Ridetech HQ series: Shockwave front and coolride rear install - Page 2 Lowerp10

    According to Ridetech's instructions, plates can be left to float on axle....

    Step 12: Check that everything is functioning properly, air is filling and exhausting from bags, no leaks are detected.

    Step 13: Place wheels back on the car, remove jacks, tie up any loose ends and ENJOY!!!!!
    Gooched78Caprice
    Gooched78Caprice
    Freshman Member (Tier 3)
    Freshman Member (Tier 3)
    5th Year Anniversary
    Celebrating 5 years of being our member!


    Posts : 108
    Join date : 2014-11-06
    Location : Border riding in the 3-6-oh & 5-oh-3 WA/OR

    Caprice/Impala Ridetech HQ series: Shockwave front and coolride rear install - Page 2 Empty Re: Caprice/Impala Ridetech HQ series: Shockwave front and coolride rear install

    Post  Gooched78Caprice Sun Apr 05, 2015 6:19 pm

    This is not supposed to be how the bags sit on the lower mount!
    Caprice/Impala Ridetech HQ series: Shockwave front and coolride rear install - Page 2 Bagpro10
    This happened just as I pulled into my driveway after about a 15 mile trip with the kids in the back seat. Rolling Eyes

    After contacting Ridetech this happens when you over tighten the lower plate.... I could see how that would be a possibility but it has a bolt with a lock washer that I know I only snugged up to the plate, not too tight and just like the other side that has held perfectly. From the moment I put this on the ground and ran it through it's initial test when it aired out you could hear what sounded like metal sliding on metal but after inspecting more than once I couldn't see where it was coming from and then it seemed to have went away shortly thereafter. The other day we went for a family drive and when we were leaving the spot we drove to and aired up my wife and I both heard the noise again. Pulling in to my driveway I heard a clunk and stopped the car immediately.

    Caprice/Impala Ridetech HQ series: Shockwave front and coolride rear install - Page 2 Bolt10

    Caprice/Impala Ridetech HQ series: Shockwave front and coolride rear install - Page 2 Goldpi10

    According to Ridetech this will happen if you over tighten the plates to the bag. I can tell you there were still 4 or 5 threads you could see before the bolt would have bottomed out in the gold piece that sits in the bags so I know it couldn't have been pushed out. I tightened both sides relatively the same as the other side that has worked flawlessly. This isn't my first time doing suspension work, just air suspension, so I know not to over tighten with these projects. I am now paying for shipping to get the bag back to them to have them inspect it. At the same time I can't get the phone app to work more than just the one time you initially set it up. After I close out of the app it won't do anything other than show me tank PSI, so that is going back to see if it an updated also. We'll see what they say... Updates will follow....

    You can leave the plates floating but I ABSOLUTELY DO RECOMMEND TO ADD A COUPLE WELDS TO THE LOWER PLATE AND AXLE FOR YOUR OWN AND OTHERS SAFETY!

    BY THE WAY AIR RIDE IS STILL AMAZING AND THE ONLY REASON IT HAS TAKEN SO LONG TO UPDATE THE INSTALL IS IVE BEEN HAVING WAY TOO MUCH FUN DIALING IN THE REBOUND ADJUSTMENTS AND FINE TUNING EVERYTHING! All projects are bound to have hiccups and I would do this all the same if I had the chance to do so... Except for following the provided instructions.


    Last edited by Gooched78Caprice on Sun Apr 05, 2015 8:48 pm; edited 1 time in total (Reason for editing : correct *hear)
    Sweet Seventy9
    Sweet Seventy9
    *Senior Moderator*
    *Senior Moderator*
    Helpful and Responsive Member!
    Very active with responding and helping other members with questions and concerns.
    10th Year Anniversary
    10 years of being a member on our forum!


    Posts : 973
    Join date : 2013-11-03
    Location : Upstate NY

    Caprice/Impala Ridetech HQ series: Shockwave front and coolride rear install - Page 2 Empty Re: Caprice/Impala Ridetech HQ series: Shockwave front and coolride rear install

    Post  Sweet Seventy9 Sun Apr 05, 2015 7:15 pm

    Gooched78Caprice wrote:Chapter IV.. Space, the fun of making it disappear... The final installation.


    These are the voyages of Irene and Tyler.  Their 5 year mission: To explore fancy new ride tech parts, to seek out installation tips and techniques, to boldly go where few Caprice owners have gone before.

    Laughing
    Gooched78Caprice
    Gooched78Caprice
    Freshman Member (Tier 3)
    Freshman Member (Tier 3)
    5th Year Anniversary
    Celebrating 5 years of being our member!


    Posts : 108
    Join date : 2014-11-06
    Location : Border riding in the 3-6-oh & 5-oh-3 WA/OR

    Caprice/Impala Ridetech HQ series: Shockwave front and coolride rear install - Page 2 Empty Re: Caprice/Impala Ridetech HQ series: Shockwave front and coolride rear install

    Post  Gooched78Caprice Mon Apr 06, 2015 11:21 am

    solo79 wrote:
    Gooched78Caprice wrote:Finally was able to get this loaded... If there is a way to upload video from my computer without loading on to youtube please let me know.

    HERE IS IRENE A. RITTLE

    Caprice/Impala Ridetech HQ series: Shockwave front and coolride rear install - Page 2 Heresh10

    If you are looking to see your car go up and down as much as possible please do not buy these shockwave's, the cool rides would be great for that.

    Wow, love that stance!  Brings back memories.  I guess my biggest challenge is I want to achieve close to what I could with hydraulics as far as being able to sit it down real low, but also be able to raise the front and rear past factory height.  I've been told that I will not get the travel I had with hydraulics.  Here are some shots of my former car all the way down and how high it went front and back for reference:

    Caprice/Impala Ridetech HQ series: Shockwave front and coolride rear install - Page 2 Car910

    Caprice/Impala Ridetech HQ series: Shockwave front and coolride rear install - Page 2 Car610

    Caprice/Impala Ridetech HQ series: Shockwave front and coolride rear install - Page 2 Car2110

    Caprice/Impala Ridetech HQ series: Shockwave front and coolride rear install - Page 2 Car2210

    I would love to be able to do this with air.  Looking forward to shots of your car in these positions.  I couldn't find one with mine locked all the way up front and back.  Would like to see what yours looks like all the way up front and back.

    Taking measurements at the highest point of the wheel well:

    23" lowered rear
    31" raised rear

    23.5" lowered front
    28" raised front

    I am still going to get better pics up replicating the stances you show but it'll probably be a couple weeks now.

    Here's some shots I got in the driveway with the cell phone for a basic idea:
    Caprice/Impala Ridetech HQ series: Shockwave front and coolride rear install - Page 2 Lifted10
    Caprice/Impala Ridetech HQ series: Shockwave front and coolride rear install - Page 2 Frontl10
    solo79
    solo79
    *Senior Moderator*
    *Senior Moderator*
    10th Year Anniversary
    10 years of being a member on our forum!


    Posts : 458
    Join date : 2013-02-06
    Location : Kentucky

    Caprice/Impala Ridetech HQ series: Shockwave front and coolride rear install - Page 2 Empty Re: Caprice/Impala Ridetech HQ series: Shockwave front and coolride rear install

    Post  solo79 Tue Apr 07, 2015 8:09 pm

    Gooched78Caprice wrote:This is not supposed to be how the bags sit on the lower mount!
    Caprice/Impala Ridetech HQ series: Shockwave front and coolride rear install - Page 2 Bagpro10
    This happened just as I pulled into my driveway after about a 15 mile trip with the kids in the back seat. Rolling Eyes

    After contacting Ridetech this happens when you over tighten the lower plate.... I could see how that would be a possibility but it has a bolt with a lock washer that I know I only snugged up to the plate, not too tight and just like the other side that has held perfectly. From the moment I put this on the ground and ran it through it's initial test when it aired out you could hear what sounded like metal sliding on metal but after inspecting more than once I couldn't see where it was coming from and then it seemed to have went away shortly thereafter. The other day we went for a family drive and when we were leaving the spot we drove to and aired up my wife and I both heard the noise again. Pulling in to my driveway I heard a clunk and stopped the car immediately.

    Caprice/Impala Ridetech HQ series: Shockwave front and coolride rear install - Page 2 Bolt10

    Caprice/Impala Ridetech HQ series: Shockwave front and coolride rear install - Page 2 Goldpi10

    According to Ridetech this will happen if you over tighten the plates to the bag. I can tell you there were still 4 or 5 threads you could see before the bolt would have bottomed out in the gold piece that sits in the bags so I know it couldn't have been pushed out. I tightened both sides relatively the same as the other side that has worked flawlessly. This isn't my first time doing suspension work, just air suspension, so I know not to over tighten with these projects. I am now paying for shipping to get the bag back to them to have them inspect it. At the same time I can't get the phone app to work more than just the one time you initially set it up. After I close out of the app it won't do anything other than show me tank PSI, so that is going back to see if it an updated also. We'll see what they say... Updates will follow....

    You can leave the plates floating but I ABSOLUTELY DO RECOMMEND TO ADD A COUPLE WELDS TO THE LOWER PLATE AND AXLE FOR YOUR OWN AND OTHERS SAFETY!


    Holy smokes!  That's not cool.  I was wondering about those bottom plates just floating on there.  You would think that since the factory spring just sits there, so would the bag and mount.  So, I guess if you tack welded those plates, then you couldn't undo the bag mount without grinding off the welds to get to that bolt underneath.  Glad you are discovering this for the rest of us so we know what to expect.  Seems kind of odd that the bag would just jump off of there.  I mean, this is something that I'd expect with hydraulics (stuff breaking) not air-ride.  Interesting.
    solo79
    solo79
    *Senior Moderator*
    *Senior Moderator*
    10th Year Anniversary
    10 years of being a member on our forum!


    Posts : 458
    Join date : 2013-02-06
    Location : Kentucky

    Caprice/Impala Ridetech HQ series: Shockwave front and coolride rear install - Page 2 Empty Re: Caprice/Impala Ridetech HQ series: Shockwave front and coolride rear install

    Post  solo79 Tue Apr 07, 2015 8:15 pm

    Gooched78Caprice wrote:

    Taking measurements at the highest point of the wheel well:

    23" lowered rear
    31" raised rear

    23.5" lowered front
    28" raised front

    I am still going to get better pics up replicating the stances you show but it'll probably be a couple weeks now.

    Here's some shots I got in the driveway with the cell phone for a basic idea:
    Caprice/Impala Ridetech HQ series: Shockwave front and coolride rear install - Page 2 Lifted10
    Caprice/Impala Ridetech HQ series: Shockwave front and coolride rear install - Page 2 Frontl10

    That's not bad at all. It looks to go up higher than I thought it would and in fact, almost as high as I could jack my car. I had 12" cylinders in the rear of mine though and 10" in the front, whereas most people run 8" in the front and 10" in the rear, however going up full 12" in the rear causes the drive shaft to vibrate because it puts the u-joints in quite a bind. Do you notice any u-joint vibration when driving with the rear all the way up and the front down? Just curious. Looks great and I definitely like the height there.
    Gooched78Caprice
    Gooched78Caprice
    Freshman Member (Tier 3)
    Freshman Member (Tier 3)
    5th Year Anniversary
    Celebrating 5 years of being our member!


    Posts : 108
    Join date : 2014-11-06
    Location : Border riding in the 3-6-oh & 5-oh-3 WA/OR

    Caprice/Impala Ridetech HQ series: Shockwave front and coolride rear install - Page 2 Empty Re: Caprice/Impala Ridetech HQ series: Shockwave front and coolride rear install

    Post  Gooched78Caprice Sun Apr 12, 2015 4:39 pm

    solo79 wrote:
    Gooched78Caprice wrote:This is not supposed to be how the bags sit on the lower mount!
    Caprice/Impala Ridetech HQ series: Shockwave front and coolride rear install - Page 2 Bagpro10
    This happened just as I pulled into my driveway after about a 15 mile trip with the kids in the back seat. Rolling Eyes

    After contacting Ridetech this happens when you over tighten the lower plate.... I could see how that would be a possibility but it has a bolt with a lock washer that I know I only snugged up to the plate, not too tight and just like the other side that has held perfectly. From the moment I put this on the ground and ran it through it's initial test when it aired out you could hear what sounded like metal sliding on metal but after inspecting more than once I couldn't see where it was coming from and then it seemed to have went away shortly thereafter. The other day we went for a family drive and when we were leaving the spot we drove to and aired up my wife and I both heard the noise again. Pulling in to my driveway I heard a clunk and stopped the car immediately.

    Caprice/Impala Ridetech HQ series: Shockwave front and coolride rear install - Page 2 Bolt10

    Caprice/Impala Ridetech HQ series: Shockwave front and coolride rear install - Page 2 Goldpi10

    According to Ridetech this will happen if you over tighten the plates to the bag. I can tell you there were still 4 or 5 threads you could see before the bolt would have bottomed out in the gold piece that sits in the bags so I know it couldn't have been pushed out. I tightened both sides relatively the same as the other side that has worked flawlessly. This isn't my first time doing suspension work, just air suspension, so I know not to over tighten with these projects. I am now paying for shipping to get the bag back to them to have them inspect it. At the same time I can't get the phone app to work more than just the one time you initially set it up. After I close out of the app it won't do anything other than show me tank PSI, so that is going back to see if it an updated also. We'll see what they say... Updates will follow....

    You can leave the plates floating but I ABSOLUTELY DO RECOMMEND TO ADD A COUPLE WELDS TO THE LOWER PLATE AND AXLE FOR YOUR OWN AND OTHERS SAFETY!


    Holy smokes!  That's not cool.  I was wondering about those bottom plates just floating on there.  You would think that since the factory spring just sits there, so would the bag and mount.  So, I guess if you tack welded those plates, then you couldn't undo the bag mount without grinding off the welds to get to that bolt underneath.  Glad you are discovering this for the rest of us so we know what to expect.  Seems kind of odd that the bag would just jump off of there.  I mean, this is something that I'd expect with hydraulics (stuff breaking) not air-ride.  Interesting.

    I will definitely be tacking the plates on this time. I should have listened to the questions you asked previously and did it as precaution anyway, lesson learned. Saying that, I do believe what happened was worse case scenario and at least I can now attest to how strong the bags are. They are extremely thick and tough, the whole rear weight of the car pushing the bag on to the spring plate and it lived to function with only a small scar.

    I would still say it would have more than likely never been an issue if the lower bag connection hadn't been loosely seated somehow. For personal testing purposes, once I hammered that little bugger back in and I did put on approx. another 20 miles. Never over 40MPH and mostly 30MPH or under, with jack and tools in tow, before sending it back and seemingly had no issues. Even went over a few extra speed bumps and in and out of a few driveways in the same manner when it popped off just to double check.


    Last edited by Gooched78Caprice on Sun Apr 12, 2015 5:37 pm; edited 1 time in total
    Gooched78Caprice
    Gooched78Caprice
    Freshman Member (Tier 3)
    Freshman Member (Tier 3)
    5th Year Anniversary
    Celebrating 5 years of being our member!


    Posts : 108
    Join date : 2014-11-06
    Location : Border riding in the 3-6-oh & 5-oh-3 WA/OR

    Caprice/Impala Ridetech HQ series: Shockwave front and coolride rear install - Page 2 Empty Re: Caprice/Impala Ridetech HQ series: Shockwave front and coolride rear install

    Post  Gooched78Caprice Sun Apr 12, 2015 5:27 pm

    solo79 wrote:
    Gooched78Caprice wrote:
    I had 12" cylinders in the rear of mine though and 10" in the front, whereas most people run 8" in the front and 10" in the rear, however going up full 12" in the rear causes the drive shaft to vibrate because it puts the u-joints in quite a bind.  Do you notice any u-joint vibration when driving with the rear all the way up and the front down?  Just curious.  Looks great and I definitely like the height there.

    I haven't noticed any vibration when the back is lifted. The stances with this air setup are not nearly as drastic as you were able to pull off with those hydraulics. The limited lift of the shockwaves make the different stances a little more subtle but I still think it pulls off the looks that I think about when I envision the olskool lowrider magazines from my youth. Thanks for all the positivity and help with this project, everyone's input is greatly appreciated!
    Gooched78Caprice
    Gooched78Caprice
    Freshman Member (Tier 3)
    Freshman Member (Tier 3)
    5th Year Anniversary
    Celebrating 5 years of being our member!


    Posts : 108
    Join date : 2014-11-06
    Location : Border riding in the 3-6-oh & 5-oh-3 WA/OR

    Caprice/Impala Ridetech HQ series: Shockwave front and coolride rear install - Page 2 Empty Re: Caprice/Impala Ridetech HQ series: Shockwave front and coolride rear install

    Post  Gooched78Caprice Tue May 12, 2015 6:11 pm

    So Ridetech has sent me a new rear air spring so over the last couple weeks I've been running Irene through the paces, playing with the rebound adjustments and the air PSI's.

    First thoughts on adjustments:
    So far the car rides smoothest right about 98-105 PSI in the front and 55-65 PSI in the back, she chews up potholes and spits out nothing but smooth caddi comfort, my #2 preset is for 100 and 60. My #3 setting is for when I'm pushing the pace and getting on Irene she likes the front around 110 PSI with the back about 70 PSI and you can feel the whole suspension firm up for the fun winding corners and on ramps, it's a beautiful thing to behold. You can cruise lowrider style around have more of the slammed look at around 90PSI in the front and 40 PSI in the back but you'll want to avoid the potholes at all cost. You can go for the 30" wheel look and run 120 PSI in the front and 100 PSI in the back. Too low and too high PSI's can destroy the Shockwave so you don't want to be going too fast and make sure to avoid road damage in either extreme, they are not warrantied for "D'oh" moments. Right now I have rebound set just a couple 'clicks' (3 front, 2 back) stiffer than the middle of the shocks adjustments. Now that I have the air dialed in I'm going to start playing more with the rebound adjustments and will update as I go.

    Things I've modified since getting back up and running:

    I had to cut off the part of the bumpstops on the lower control arms where it starts to come up to a point since that part of the bumpstop was slightly rubbing on the side of air bag. I could have notched the side of the bumpstop out but It looked cleaner just cutting it smooth and flat.

    I also went and added an adjustable dump muffler for when the car is deflating. It was too hard to fine tune the suspension at first leaving the 3/8 exhaust open, it would always jump 6-8 psi in the front and about 2-3 every time you barely hit the deflate buttons. Now the front is about 2-3 PSI and the back is 1 PSI when I hit the buttons. The other nice thing I like now is you can barely hear the air releasing or notice that it's going to the ground when parked.(#1 setting is 68 front and 18 back when parked/slammed) Before it sounded like someone was letting air out of a tire and was a fast drop. I really like the more subtle effects from the adjustable dump muffler, $20 well spent.

    New fan, alternator, pump belt. Old belt started squeeling like a pig when the compressors kicked in and the voltage dropped to around 10-11 volts. Loosened the lower alternator mount bolt and tension bolt, slid the old belt off and put the new one on. Pull alternator tight, snug up tension bolt, snug up altenator mount bolt then up and running no issues... 2nd try, first try wasn't tight enough and squeeled when I put on a little throttle. For a relative newbie that felt like a nice win!

    Sponsored content


    Caprice/Impala Ridetech HQ series: Shockwave front and coolride rear install - Page 2 Empty Re: Caprice/Impala Ridetech HQ series: Shockwave front and coolride rear install

    Post  Sponsored content


      Current date/time is Fri Apr 26, 2024 5:45 am