


I found this a few years ago somewhere on the web.
It's from 2002 but still applies today.
Some of the links may no longer be good though.
Basic Brake Upgrades
by Garry Forman
The brakes on an Impala aren’t bad, so long as you don’t have to do more than a single panic stop. When the brakes are cool, stopping distances are very respectable considering the car’s two-ton mass. Where you will get into problems is after repeated panic stops, much like what you would encounter in an autocross or road racing event. The enemy is heat – more on that later.
When the Impala SS was new (‘94-‘95) several car magazines tested it and came up with an average 60-0 mph stopping distance of 120 ft. This compared favorably with cars like the Corvette at 119 ft., the Camaro at 112 ft. and the Mustang at 125 ft. Another comparison would be with typical family cars like a Taurus at 146 ft. or a civic at 140 ft. These tests are typically done with cold brakes. If they were to repeat the test with multiple panic stops, by the 3rd try there would be serious brake fade and a dramatic increase in stopping distances.
An interesting sidebar is that Motor Trend later tested a ’96 Callaway Supernatural conversion fitted with 4-piston Brembo’s. The big Brembo’s only managed to reduce the stopping distance to 115 ft. The up side of this is they did dozens of back to back stops without a touch of brake fade.
Brakes convert kinetic energy, the momentum of your moving car, into heat. Heat is generated by the friction of pads against rotors, and must be dissipated into the surrounding air. If you want to improve the performance of your brakes you need to think about generating heat, tolerating the heat that has been generated and then dissipating the heat. The Impala’s short stopping distance, even with stock brakes, shows there is little problem generating heat. The most significant changes you can make are those that allow it to tolerate more heat, until the heat can dissipate.
Before you begin any project you should have a clear idea of what you want in the end. The requirements for autocross are different than lapping sessions at Road America, so begin with an honest assessment of what you plan to do with your Impala. My own goal is for autocrossing, primarily high-speed Solo-I events held at area road racing tracks. An autocross held on a road racing track is still an autocross. The significance here is that autocrosses last only a single lap, road racing goes on for multiple laps and has to deal with much higher temperatures.
Brake Fluid:
This might not seem like a performance-enhancing tip, but it’s important! You need to have good clean brake fluid or nothing else you do will make a difference. If your car sees only mild street duty, you can probably get away with changing your brake fluid every other year. Even if it sits in storage most of the time, humidity from the air will be absorbed into the fluid. A daily driver that sees moderate to heavy duty should have the brake fluid changed every year. Just think of it as spring cleaning and do every year. If you plan on autocrossing you should change it more frequently. My own rule of thumb is to change the fluid after every fourth event. For me, that works out to three times a year. Many road racers will change their fluid before every event they run.
Why bother? In this case the problem is moisture, specifically water, that gets absorbed into the fluid. Moisture is a problem for two reasons. The first has to do with boiling temperatures. Heat generated by the friction of pads on rotors has to go somewhere, and some of it gets into the brake lines and brake fluid. Brake fluid has a very high boiling point, but water does not! The more moisture in your fluid the lower the boiling point will be. Under extreme conditions the water will boil out, creating gas pockets in your brake lines. This doesn’t happen often, but when it does, you’ll have the brake pedal to the floor and the brakes will just not grab. The other problem moisture causes is rust. Most of the system, from the master cylinder, through the brake lines to the calipers and pistons is made of steel. Rust on the piston or caliper can result in leaks. Rust in the brake line can cause it to burst. Play it safe and change the brake fluid frequently.
There is an excellent article on the web by Dave Zeckhausen at: http://www.shotimes.com/SHO3brakefluid.html which details differences in various brands of fluid, dry and wet boiling points, why fluid from metal cans is better than plastic bottles, and much more. It’s well worth the read. You can also look to the IGBA technical archives at: http://www.b-body.net/Technical/Brakes/Bleeding.html for good information on bleeding the old fluid out of your brakes.
Brake Pads:
Brake pads are designed to operate at specific temperatures. The stock factory pads are designed to work best when cold and have a fairly narrow working temperature range. As the pads heat up their effectiveness falls off quickly. The primary difference between stock pads and after-market performance pads is the working temperature range. Performance pads will be effective over a wider range. They’re designed work well cold, and retain their effectiveness as the pad temperatures get fairly hot. Any street driven car will benefit from good quality performance brake pads and it should be your first brake upgrade. If you autocross, it should be considered a necessity.
Another category of pads is racing pads, which are sometimes also called z-rated pads. These are intended for multi-lap road racing events where temperatures can skyrocket. The working temperature range doesn’t begin until the pads are hot and stays effective through red-hot temperatures. You can buy racing pads that fit stock Impala calipers, but they are not suitable for a street driven car or for autocrosses because under these conditions they don’t get up to temperature. If you plan to drive your car to a lapping day at a local track, you should drive there with street performance pads and swap to race pads after you arrive. When the day is done, swap back to the street performance pads before you drive home.
I use Performance Friction pads, part number 6144, for my 1996 Impala SS. Other street performance pads that are probably just as good are manufactured by GM under the DuraStop name, by Hawk Performance and by Raybestos under the BruteStop name. My reason for selecting Performance Friction pads was pretty simple; the AutoZone store where I bought them includes a free lifetime replacement warranty. Yes, they now know me on a first name basis.
There may be minor trade offs when switching from stock pads to performance pads. Depending on the brand, they may wear faster and need to be replaced more often. They may generate more brake dust, which will accumulate on the front wheels. They may make more noise; from squealing to buzzing sounds and some brands can cause the rotors to wear faster than normal.
Brake Rotors:
Switching to performance pads means you will be able to apply friction over a wider range of conditions, which really means you will be generating more heat. It also means the rotors will have to tolerate and dissipate more heat. If your car is street driven, the stock GM rotor are fine. If do occasional Solo-II autocrosses, stock rotors are OK but premium after-market rotors would be better. If you do frequent Solo-II or any Solo-I events, you really should upgrade the rotors. The difference between stock and premium rotors will be higher quality iron used in the manufacturing, more cooling vanes, directional cooling vanes and thicker cheeks. If you’re not familiar with the term rotor “cheek”, it’s one half of the two friction surfaces of a vented disc rotor. If you make each of the cheeks thicker and the vane that joins the two surfaces together thinner, the overall thickness is the same yet there can be much more mass. The more mass you have, the better it acts as a heat-sink. All this combines to mean they can tolerate higher than normal operating conditions.
There are only three brands of premium after-market replacements worth consideration. Auto Specialties offers good rotors under the brand name Power Stop. GT Rotors from Grob-Till Industries are very good. Power Slot rotors from Power Performance Group are just as good or better. What ever you do, avoid drilled rotors! They may look cool, but the holes will be a focal point for stress fractures. Even in mild racing conditions you could literally shatter a rotor. The other problem with holes is they reduce the overall available friction area. If the point of the system is for pads to create friction by contacting the rotor, any holes in the rotor are that much less friction area.
When you replace the rotors, it’s a good idea to replace the inner and outer wheel bearing at the same time. You’ll need a pair of inner bearings, a pair of outer bearings and new grease seals. Wheel bearing are sold in sets, with matched bearing races. Sometimes new brake rotors will come with generic races already pressed in. If you get rotors that already have generic races, it’s best to take them to a machine shop to have them removed and the ones that came with your new bearings pressed in.
Aside from the cost, there are no trade offs when switching to premium after-market rotors. The price is generally around $160.00 to $190.00 per rotor, or about double the price of a stock GM rotor.
Brake Hoses:
Most of the brake line, from the master cylinder to the fenders, is hard wall steel tubing. The last few inches, from the fender to the caliper, needs to be flexible to accommodate suspension travel. This piece is the brake hose and it is usually made from reinforced rubber. The reinforcement comes from multiple layers of nylon or polyester cords, much like a car tire. Under every day driving conditions this works fine, but under extreme conditions excessive heat has a way of messing things up. The same heat that might boil your brake fluid can soften rubber brake hoses. When this occurs, fluid will start to balloon in the hose. The hose swells and fluid just stays there, instead of moving to push the piston. The end result is much like boiling fluid; the brakes just won’t grab even though the pedal is to the floor.
The solution for this is fairly simple. You can replace the rubber brake hoses with ones made from Teflon & braided stainless steel. They are available from a variety of manufactures, including Earls, Fischer-Hydraulik and Russell Performance. Expect the cost to be about $100.00 for a set of all four hoses. There is no down side (other than the cost) so you might want to think about adding these to a street driven car the next time it needs any brake maintenance.
Combi-Valve:
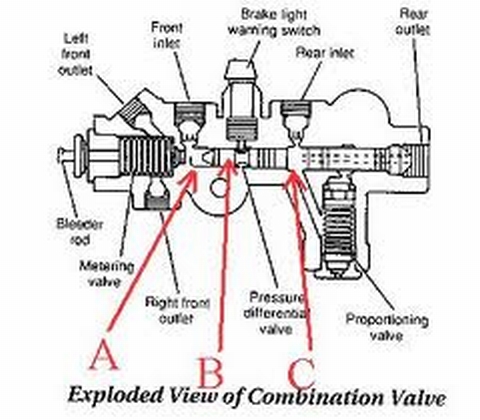
The brake combi-valve controls proportioning of how much brake force is directed to the front wheels and how much to the rear wheels. The one installed in an Impala SS is the same one originally installed on Caprices with front-disc/rear-drum brakes. Because of functional differences between drum and disk brakes, cars with rear drums use a device which delays the onset of braking to the drums as well as reducing the pressure to the rear bake cylinders. The combi-valve directs most of the braking force (as much as 95%) to the front brakes and almost nothing to the rear. GM never revised the proportioning for 4-wheel disc and as a result, Impala braking is less than optimal.
The combi-valve can be modified to correct this oversight. The mod will remove the delay and increase the proportion of brake fluid pressure to the rear calipers. This is accomplished by removing 2 parts, a spring and a red aluminum valve, from the brake combination valve and replacing the vented cap with a solid cap (see "Bolt Mod"). The authoritative write-up of this subject can be found on the web at: http://www.b-body.net/Technical/Brakes/ComboValveMod/index.html
Brake Deflectors:
The mods so far have been intended to generate more friction and to tolerate more heat. A simple mod to help dissipate some of the extra heat is swapping 9C1 brake deflectors in place of the stock Impala deflectors. Just below the front bumper is an air dam. The air dam is made from 3" black plastic that spans the full width of the car. It consists of three pieces; a center section and two end deflectors. The stock deflectors shroud the front tires and limit air that would otherwise be able to cool the front brakes. The 9C1 deflectors do not shroud the front tires, which lets more cool air get to the brakes. The GM part numbers are 10220593 and 10220594. The cost should be less than $10.00 each.
It's from 2002 but still applies today.
Some of the links may no longer be good though.
Basic Brake Upgrades
by Garry Forman
The brakes on an Impala aren’t bad, so long as you don’t have to do more than a single panic stop. When the brakes are cool, stopping distances are very respectable considering the car’s two-ton mass. Where you will get into problems is after repeated panic stops, much like what you would encounter in an autocross or road racing event. The enemy is heat – more on that later.
When the Impala SS was new (‘94-‘95) several car magazines tested it and came up with an average 60-0 mph stopping distance of 120 ft. This compared favorably with cars like the Corvette at 119 ft., the Camaro at 112 ft. and the Mustang at 125 ft. Another comparison would be with typical family cars like a Taurus at 146 ft. or a civic at 140 ft. These tests are typically done with cold brakes. If they were to repeat the test with multiple panic stops, by the 3rd try there would be serious brake fade and a dramatic increase in stopping distances.
An interesting sidebar is that Motor Trend later tested a ’96 Callaway Supernatural conversion fitted with 4-piston Brembo’s. The big Brembo’s only managed to reduce the stopping distance to 115 ft. The up side of this is they did dozens of back to back stops without a touch of brake fade.
Brakes convert kinetic energy, the momentum of your moving car, into heat. Heat is generated by the friction of pads against rotors, and must be dissipated into the surrounding air. If you want to improve the performance of your brakes you need to think about generating heat, tolerating the heat that has been generated and then dissipating the heat. The Impala’s short stopping distance, even with stock brakes, shows there is little problem generating heat. The most significant changes you can make are those that allow it to tolerate more heat, until the heat can dissipate.
Before you begin any project you should have a clear idea of what you want in the end. The requirements for autocross are different than lapping sessions at Road America, so begin with an honest assessment of what you plan to do with your Impala. My own goal is for autocrossing, primarily high-speed Solo-I events held at area road racing tracks. An autocross held on a road racing track is still an autocross. The significance here is that autocrosses last only a single lap, road racing goes on for multiple laps and has to deal with much higher temperatures.
Brake Fluid:
This might not seem like a performance-enhancing tip, but it’s important! You need to have good clean brake fluid or nothing else you do will make a difference. If your car sees only mild street duty, you can probably get away with changing your brake fluid every other year. Even if it sits in storage most of the time, humidity from the air will be absorbed into the fluid. A daily driver that sees moderate to heavy duty should have the brake fluid changed every year. Just think of it as spring cleaning and do every year. If you plan on autocrossing you should change it more frequently. My own rule of thumb is to change the fluid after every fourth event. For me, that works out to three times a year. Many road racers will change their fluid before every event they run.
Why bother? In this case the problem is moisture, specifically water, that gets absorbed into the fluid. Moisture is a problem for two reasons. The first has to do with boiling temperatures. Heat generated by the friction of pads on rotors has to go somewhere, and some of it gets into the brake lines and brake fluid. Brake fluid has a very high boiling point, but water does not! The more moisture in your fluid the lower the boiling point will be. Under extreme conditions the water will boil out, creating gas pockets in your brake lines. This doesn’t happen often, but when it does, you’ll have the brake pedal to the floor and the brakes will just not grab. The other problem moisture causes is rust. Most of the system, from the master cylinder, through the brake lines to the calipers and pistons is made of steel. Rust on the piston or caliper can result in leaks. Rust in the brake line can cause it to burst. Play it safe and change the brake fluid frequently.
There is an excellent article on the web by Dave Zeckhausen at: http://www.shotimes.com/SHO3brakefluid.html which details differences in various brands of fluid, dry and wet boiling points, why fluid from metal cans is better than plastic bottles, and much more. It’s well worth the read. You can also look to the IGBA technical archives at: http://www.b-body.net/Technical/Brakes/Bleeding.html for good information on bleeding the old fluid out of your brakes.
Brake Pads:
Brake pads are designed to operate at specific temperatures. The stock factory pads are designed to work best when cold and have a fairly narrow working temperature range. As the pads heat up their effectiveness falls off quickly. The primary difference between stock pads and after-market performance pads is the working temperature range. Performance pads will be effective over a wider range. They’re designed work well cold, and retain their effectiveness as the pad temperatures get fairly hot. Any street driven car will benefit from good quality performance brake pads and it should be your first brake upgrade. If you autocross, it should be considered a necessity.
Another category of pads is racing pads, which are sometimes also called z-rated pads. These are intended for multi-lap road racing events where temperatures can skyrocket. The working temperature range doesn’t begin until the pads are hot and stays effective through red-hot temperatures. You can buy racing pads that fit stock Impala calipers, but they are not suitable for a street driven car or for autocrosses because under these conditions they don’t get up to temperature. If you plan to drive your car to a lapping day at a local track, you should drive there with street performance pads and swap to race pads after you arrive. When the day is done, swap back to the street performance pads before you drive home.
I use Performance Friction pads, part number 6144, for my 1996 Impala SS. Other street performance pads that are probably just as good are manufactured by GM under the DuraStop name, by Hawk Performance and by Raybestos under the BruteStop name. My reason for selecting Performance Friction pads was pretty simple; the AutoZone store where I bought them includes a free lifetime replacement warranty. Yes, they now know me on a first name basis.
There may be minor trade offs when switching from stock pads to performance pads. Depending on the brand, they may wear faster and need to be replaced more often. They may generate more brake dust, which will accumulate on the front wheels. They may make more noise; from squealing to buzzing sounds and some brands can cause the rotors to wear faster than normal.
Brake Rotors:
Switching to performance pads means you will be able to apply friction over a wider range of conditions, which really means you will be generating more heat. It also means the rotors will have to tolerate and dissipate more heat. If your car is street driven, the stock GM rotor are fine. If do occasional Solo-II autocrosses, stock rotors are OK but premium after-market rotors would be better. If you do frequent Solo-II or any Solo-I events, you really should upgrade the rotors. The difference between stock and premium rotors will be higher quality iron used in the manufacturing, more cooling vanes, directional cooling vanes and thicker cheeks. If you’re not familiar with the term rotor “cheek”, it’s one half of the two friction surfaces of a vented disc rotor. If you make each of the cheeks thicker and the vane that joins the two surfaces together thinner, the overall thickness is the same yet there can be much more mass. The more mass you have, the better it acts as a heat-sink. All this combines to mean they can tolerate higher than normal operating conditions.
There are only three brands of premium after-market replacements worth consideration. Auto Specialties offers good rotors under the brand name Power Stop. GT Rotors from Grob-Till Industries are very good. Power Slot rotors from Power Performance Group are just as good or better. What ever you do, avoid drilled rotors! They may look cool, but the holes will be a focal point for stress fractures. Even in mild racing conditions you could literally shatter a rotor. The other problem with holes is they reduce the overall available friction area. If the point of the system is for pads to create friction by contacting the rotor, any holes in the rotor are that much less friction area.
When you replace the rotors, it’s a good idea to replace the inner and outer wheel bearing at the same time. You’ll need a pair of inner bearings, a pair of outer bearings and new grease seals. Wheel bearing are sold in sets, with matched bearing races. Sometimes new brake rotors will come with generic races already pressed in. If you get rotors that already have generic races, it’s best to take them to a machine shop to have them removed and the ones that came with your new bearings pressed in.
Aside from the cost, there are no trade offs when switching to premium after-market rotors. The price is generally around $160.00 to $190.00 per rotor, or about double the price of a stock GM rotor.
Brake Hoses:
Most of the brake line, from the master cylinder to the fenders, is hard wall steel tubing. The last few inches, from the fender to the caliper, needs to be flexible to accommodate suspension travel. This piece is the brake hose and it is usually made from reinforced rubber. The reinforcement comes from multiple layers of nylon or polyester cords, much like a car tire. Under every day driving conditions this works fine, but under extreme conditions excessive heat has a way of messing things up. The same heat that might boil your brake fluid can soften rubber brake hoses. When this occurs, fluid will start to balloon in the hose. The hose swells and fluid just stays there, instead of moving to push the piston. The end result is much like boiling fluid; the brakes just won’t grab even though the pedal is to the floor.
The solution for this is fairly simple. You can replace the rubber brake hoses with ones made from Teflon & braided stainless steel. They are available from a variety of manufactures, including Earls, Fischer-Hydraulik and Russell Performance. Expect the cost to be about $100.00 for a set of all four hoses. There is no down side (other than the cost) so you might want to think about adding these to a street driven car the next time it needs any brake maintenance.
Combi-Valve:
The brake combi-valve controls proportioning of how much brake force is directed to the front wheels and how much to the rear wheels. The one installed in an Impala SS is the same one originally installed on Caprices with front-disc/rear-drum brakes. Because of functional differences between drum and disk brakes, cars with rear drums use a device which delays the onset of braking to the drums as well as reducing the pressure to the rear bake cylinders. The combi-valve directs most of the braking force (as much as 95%) to the front brakes and almost nothing to the rear. GM never revised the proportioning for 4-wheel disc and as a result, Impala braking is less than optimal.
The combi-valve can be modified to correct this oversight. The mod will remove the delay and increase the proportion of brake fluid pressure to the rear calipers. This is accomplished by removing 2 parts, a spring and a red aluminum valve, from the brake combination valve and replacing the vented cap with a solid cap (see "Bolt Mod"). The authoritative write-up of this subject can be found on the web at: http://www.b-body.net/Technical/Brakes/ComboValveMod/index.html
Brake Deflectors:
The mods so far have been intended to generate more friction and to tolerate more heat. A simple mod to help dissipate some of the extra heat is swapping 9C1 brake deflectors in place of the stock Impala deflectors. Just below the front bumper is an air dam. The air dam is made from 3" black plastic that spans the full width of the car. It consists of three pieces; a center section and two end deflectors. The stock deflectors shroud the front tires and limit air that would otherwise be able to cool the front brakes. The 9C1 deflectors do not shroud the front tires, which lets more cool air get to the brakes. The GM part numbers are 10220593 and 10220594. The cost should be less than $10.00 each.


")
